This thorough guide will go through all of the image settings of the UNV LPR to help understand what a user can adjust to help the camera Recognize Plates more effectively.
Scenes
This page is used to configure strong front light and back light scenes.

Parameter Descriptions
- Scene Name - The values include Custom, Common, Test, and Indoor. The default value is
Common. Values Test and Indoor can be ignored. In strong front light and back light scenes, you can set the value to Custom, and adjust the exposure compensation value. - Auto Switching - After configuring the schedule and illumination range for scenes and adding the scenes to the auto-switching list, select Enable Auto Switching to enable automatic switching between the scenes.
- Default - You can click Default to restore configuration on this page to factory settings.
Please Note
- If both Schedule and Illumination are configured for a scene, the scene takes effect only when both items meet requirements. If only one of the two items is configured, the scene takes effect when this configured item meets requirements
- Each scene supports multiple groups of schedule and illumination settings. The scene takes effect when one group meets requirements.
- If you select Enable Auto Switching, scene settings become unavailable
- You are advised to use the central weight. If vehicle images do not meet expected effects under front light and back light, you can configure scenes based on the on-site conditions.
Image Enhancement
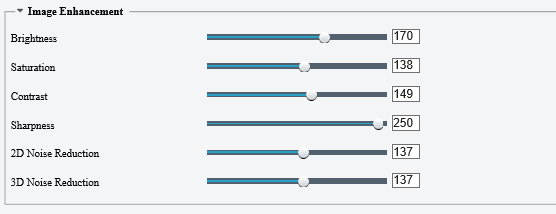
Parameter Descriptions
- Image Enhancement - You can use the default values for the parameters. (2D Noise Reduction indicates noise reduction within a frame. A larger value indicates stronger noise reduction and more blur images. 3D Noise Reduction indicates that non-repeated information is filtered out through adjacent frame image comparison to display pure and refined images. However, motion blur or hosting may occur.)
Exposure
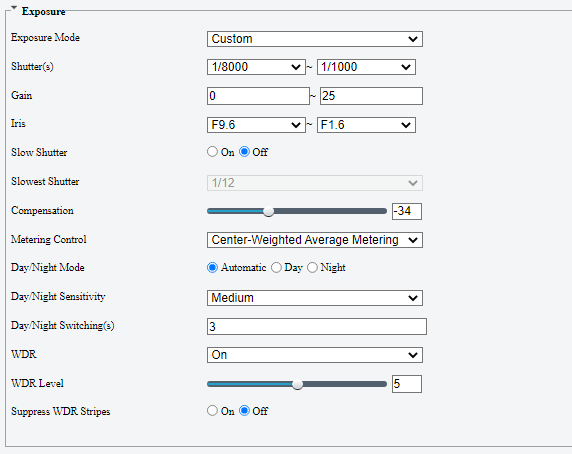
Parameter Descriptions
- Exposure Mode - The default value is Custom. Available values include Automatic, Custom,
Iris Priority, Indoor 50Hz, Indoor 60Hz, Manual, and Low Motion Blur. You
can keep the default setting. - Shutter(s) - When Exposure Mode is set to Custom, the default range is 1/10000 to 1/250. A too great value causes ghosting while a too small value produces dark images.
- Gain - When Exposure Mode is set to Custom, the default range is 0 to 25. You can adjust the value properly under night conditions. A greater gain increases the brightness but introduces noises, while a smaller gain decreases the image brightness.
- Slow Shutter/Slowest Shutter - You can enable Slow Shutter and adjust the value of Slowest Shutter. However, a slow shutter increases the image brightness while reducing the frame rate, and can cause motion blur or ghosting. You are advised to use the default setting.
- Compensation - The default value is 0, and you can retain the default value. If the application environment of the camera has serious front or back light, adjust the compensation value to improve the image effect. In a back light environment, increase the compensation value. In a front light environment, reduce the compensation value.
- Metering Control - The default value is Center-Weighted Average Metering, and you can retain the default value. If the brightness difference in different areas of an image is large, set the value to Evaluative Metering(BLC). Evaluative Metering(BLC) is implemented by adjusting the brightness weight in different areas. Center-Weighted Average Metering focuses on the center of an image, and the weight of the surroundings is smaller.
- Day/Night Mode - The value is Automatic by default, and can be changed to Day or Night. Automatic indicates that the camera switches between the day and night modes based on the preset threshold. Day indicates that the camera always uses the day mode. Night indicates that the camera always uses the night mode. The day/night switch function mainly affects the LED light supplement lamp and parameters like White Balance.
- Day/Night Sensitivity - The default value is Medium, and other options include Ultra-low, Low, and High. A higher sensitivity indicates easier switchover between the day and night modes.
- Day/Night Switching(s) - The default value is 3, indicating that the camera switches between the day and night modes after the switching conditions are met for 3s.
- WDR - The default value is On, which takes effect on the whole day.
- WDR Level - You are advised to keep the default value of 5. A much high WDR level may result in blurred image or noise. A much low WDR level may result in insufficient brightness of the image.
- Suppress WDR Stripes - This function is turned off by default.
Smart Illumination
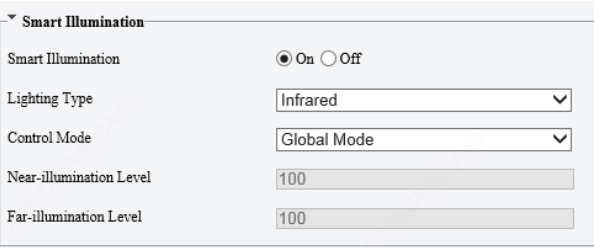
Parameter Descriptions
- Smart Illumination - The default value is On. You can disable the function if required.
- Lighting Type - The default and only value is Infrared.
- Control Mode - The values include:
- Global Mode: This default value indicates that the camera turns on the light
supplement lamp in the daytime and turns off the lamp at night. - Overexposure Restrain: Exposure is enhanced.
- Custom Level: In this mode, the light supplement lamp is turned on throughout the day. This parameter is valid only when Smart Illumination is set to On
- Global Mode: This default value indicates that the camera turns on the light
- Near-illumination Level/Far-illumination Level - The values can be configured when Control Mode is set to Custom Level. Near-illumination Level ranges from 0 to 100 .
Focus & White Balance
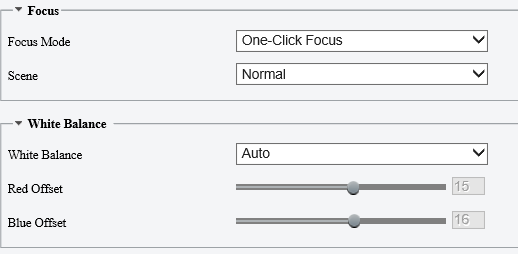
Parameter Descriptions
- Focus Mode - The default value is One-Click Focus(IR). The values include:
- One-Click Focus: In this mode, the camera determines whether the scene
changes, and automatically triggers focusing if the scene changes, which
easily causes false triggering. - Manual Focus: In this mode, focusing is triggered only when you click
- Focus+ or Focus- on the live view, and is not triggered by scene change.
- One-Click Focus(Locked): In this mode, the determined focal length is locked, and only manual adjustment will trigger focusing.
- Scene - The default value is Normal.
- White Balance - The default value is Auto. Available values include Auto, Outdoor, Fine Tune, Sodium Lamp, Locked, and Auto2. You can use the default setting.
- Red Offset - A smaller value turns the live view screen to bluish green, while a greater value turns the live view screen to reddish. The value can be configured only when White Balance is set to Fine Tune.
- Blue Offset - A smaller value turns the live view screen to yellowish, while a greater value turns the live view screen to bluish. The value can be configured only when White Balance is set to Fine Tune.
- One-Click Focus: In this mode, the camera determines whether the scene